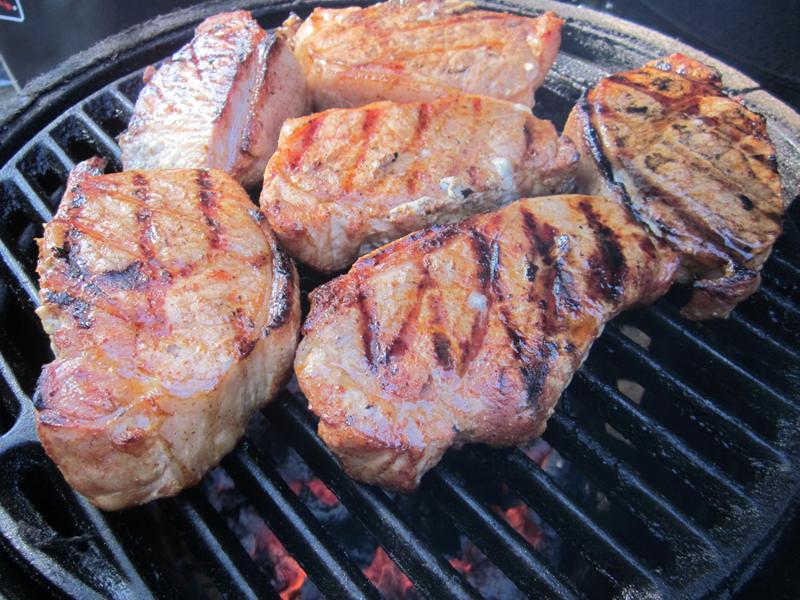
The changing of the seasons allow for a fresh approach to tired spice options. I’ve recently been enjoying many seasonal craft beers, several of which have been Pumpkin based ales. I decided to create a pork chop brine and seasoning combination which would both pair wonderfully with a Pumpkin beer and warm the soul on a chilly evening…

I used two 12oz. bottles of Kennebunk Pumpkin Ale from Trader Joe’s for this recipe. I then paired ingredients that complimented both pork and pumpkin flavors.

When you make up the brine, you might notice that there is an incredible amount of chile powder…it’s OK. This is just in the brine and not in the final BBQ rub. When you add the ingredients and a beer then bring to a simmer for 30-45 minutes, the brine blend should come out pretty red and somewhat soupy.  If your brine is too warm, after adding the second “cold” beer, place in a freezer for 15 minutes prior to putting pork chops in the brine.  Feel free to use this on any cut of pork as it is super flavorful…

Brine Seasonings:
24oz. Seasonal Pumpkin Beer
(use only 12oz for the reduction)
1 Tbsp. Cumin
1 Tbsp. Chile Powder
1 tsp. Cinnamon Powder
1 tsp. Ginger
1/2 Tbsp. Cloves
1 Tbsp. Paprika
1/4 tsp. Nutmeg
2 Tbsp. Black pepper
2 Tbsp. Sea Salt or Kosher Salt

4 thick cut 1″ Pork Chops

Directions:
In a sauce pot, add the brine seasonings to 12oz of the beer and simmer on medium heat until it is reduced by 50%. Remove from heat and let cool to room temperature.

In a large glass or stainless bowl, mix the other 12 oz. of pumpkin beer to the reduction. Place pork chops in the liquid, cover and refrigerate for 1-2 hours prior to cooking, turning regularly within the brine.

BBQ the chops at 400F until internal temperature reaches 150F. In a small bowl combine the ingredients for the finishing spice.

Finishing spice:

1/2 tsp. Sea Salt

1/2 tsp. Cumin

1/8 tsp. Chile Powder

1/4 tsp. Black pepper

1/8 tsp. Turbinado sugar

When the chops are done, remove from grill and immediately sprinkle on the finishing spice. Let the chops sit (or “rest”) for approx 10 min before serving.

Enjoy with your favorite pumpkin beer…Cheers!

Wings are the backbone of any great party. Cooked well, they will draw even the wariest chicken eater. There are lots of ways to cook wings – I have found a preferred method that requires indirect heat and a grill temp of about 280-300F for almost 3 hours. I can’t take credit for this style of wing cooking, that goes to my friend Tim Dougherty, who enlightened me in the art of the wing. Let me break it down for you.

Wing Selection: Recipe is for (1) “Family Pack” – No party wings – they must be whole wings. Make no compromises.

Trimming: Clip off the wing tip and you are left with a “V” shaped wing.

Seasoning: Santa Maria Seasoning & Old Bay.

Baste: Mix and reduce over medium heat:  (1) Fosters Blue Oil Can Beer, 3/4 cup brown sugar, 4 Tbsp. Walkers Wood Wet Jerk Seasoning.  Bring to a simmer for 10 minutes and remove from heat. Use a mop to apply.

Cooker Setup: Weber Kettle Indirect. To date, this is the best wing cooker we’ve found. This is hard to say as we are hardcore Big Green Egg fans.

Charcoal Setup: Place a heaping full chimney 75% engaged charcoal on one side of the cooker.

The Cook: Set your cooker for a steady 280 to 300 degrees. Stack the wings in a pile opposite the fire.  Apply the baste as described above every 30 minutes for the entire cook. After the first 30-45 minutes knock the wings down, Re-stack and then baste. The wings should begin to get sticky as this process is repeated.

Expected Cook Time: IF your temps have pretty much remained the same, this process will take just less than 3 hours.

Done Test: When the skin of the wing has lost some of its “puffyness” and seems to be pulled tightly against the meat itself. The yellow under skin of each wing will become golden brown and slightly crisp, but not crunchy. The wing will be leaking clear juices if you look closely.

Picanha has been used for centuries in South American BBQ.  The roast  is cut from the rump cap of the Top sirloin.  It is traditionally served in Rodizo style churrascarias (steak house) where they cook these roasts on a large sword like skewer. Pieces are then cut off of the skewer at the table directly onto a diners plate.

This roast has a very distinctive beefy flavor and tenderness indicative of many cuts of sirloin. It can be cooked similarly to a Tri-Tip roast over direct or indirect heat. It is best served when there are some grill marks on the meat side and the opposing fat cap has rendered nicely.  Consider this option next time you are looking for a great roast to cook for up to 5 people. Each roast weighs approximately 3 lbs.

Here are a few notes from my cook:

Seasoning:

(Basic Argentine Style Seasoning)
Coat the roast in Olive Oil.
Squeeze lime juice on the roast.
Season with Sea salt.
Let salt melt into meat prior to cooking.

Cooking:
Set cooker to 350-400F direct/or indirect heat. I used a Large BGE with a cast iron grate
Sear meat side first then flip to fat side for duration of the cook.
Remove from cooker when internal temp reaches 135F
Rest for 15 minutes


Santa Maria BBQ Rub

Santa Maria BBQ Rub - Fine Grind

We recently wrote an article for Barbecue Mag Online that featured several Santa Maria BBQ recipes. This dry rub recipe is featured in that article.  We find that it brings out much of the natural flavors of meats and vegetables while maintaining simplicity.  This recipe can easily be made into a larger batch and stored in your pantry or spice cabinet.

Santa Maria Dry Rub:

5 Tsp. Kosher or Sea salt

2 Tsp. Black Pepper

2 Tsp. White Pepper

1 Tsp. Onion Powder

3 Tsp. Granulated Garlic

* To add more heat, add 1/2 tsp Cayenne Pepper or Red Pepper flakes.

Suggestions: When making a dry rub, try to keep the ingredient “grinds” similar.  They will be much easier to apply in an even manner.  One more suggestion, smaller grind will melt into the meats faster and bond better during the cook. Rub a good olive oil onto the meat surface prior to seasoning, doing this will allow the dry rub to adhere better and dissolve even more quickly.

Check out the entire article in Barbecue Mag Online: www.bbqmagonline.com

Biscuit Recipe

Drop Biscuits in a Lodge cast iron biscuit pan on a Big Green Egg

Fall and Winter are prime times to bake items that compliment our seasonal soups and stews. We’ve come across this old world style Drop Biscuit recipe and modified it a bit for the Big Green Egg.

We’ve got a small Big Green Egg that loves to hover at 400F with ease and decided to put it to use.

Tools: Big Green Egg or other BBQ cooker that can maintain constant 400F indirect temperatures. Lodge cast iron biscuit pan.

Cooker Temp: 400F,  indirect heat.

Baking Directions: After making the dough, cut small 1/8″ thick pads of butter and set one pad into each void on the baking pan. Put equal parts of dough into each void on top of the butter. Be as consistent as possible and use up all of the dough – because it doesn’t keep well.  Set the now filled iron pan into the preheated cooker and close the lid.  Check the biscuits after 15 minutes and then again at 20 minutes.  You will begin to see the biscuits brown slightly where they contact the cast iron.  When they are sufficiently brown, pull them out and rest them. The biscuits should be somewhat crumbly and soft, but when given a slight turn in the baking pan, spin easily. (cooking times may vary with each grill – keep checking on them)

Dough Recipe:

Lodge Logic Cast Iron Drop Biscuit Pan

2 cups unbleached all-purpose four

2 teaspoons baking powder

1 teaspoon sugar

¾ teaspoon table salt

½ teaspoon baking soda

1 cup buttermilk, chilled

8 tablespoons (1 stick) unsalted butter, melted and slightly cooled (and additional butter for the pan)

Victorine Valley Farms Butter Flavored Olive Oil (for drizzling)

Option: Feel free to add herbs of your choice to the biscuits as well.

Mixing Instructions:

  • Wisk the flour, baking powder, sugar, salt, and baking soda together in a large bowl.
  • Mix the buttermilk and melted butter (8 tablespoons) together in a separate bowl.
  • Combine the buttermilk mixture with the dry ingredients and stir with a rubber spatula until incorporated and batter pulls away from the sides of the bowl.

Thanks to Victorine Valley Farms for providing the wonderful local Olive Oils for our recipes.  Products can be ordered on their website here…www.victorinevalley.com

This is a Caribbean style Jerk BBQ Rub – and it’s a good one. I’ve just tried it on chicken and thought I’d pass along what I did.

I make a brine out of it first…

1/2 Gallon Water
1 -4lb. Chicken, Whole
6 Tbsp – The Jerk
4 Tbsp -Light Brown Sugar

Let the chicken sit for 4 hours then pull it out & dry it off. Season with more The Jerk and wait until it melts into the meat. Remember to use the smallest container possible to brine your meats – less water means more intense results.

Grill or BBQ at 275F to 325F until done.
Remove the chicken from the cooker when the breast temps 160F

I’ll be experimenting more with this BBQ Rub in the future, but for now it will be a top choice for flavor packed chicken.

We’re excited to welcome a celebrity guest to Green Leaf BBQ …Tom Porter of Big Butz BBQ fame!

by Tom Porter of Big Butz BBQ

SHIGEN!  What? You’ve never heard of it? I can’t believe it. For those that have, I can imagine how excited you must be at just hearing the name. For those that haven’t, Shigen are a combination of Shrimp, Chicken, and Bacon. Now two thoughts are probably going through your head; how do you put all that together? And, what is so special about that? Both excellent questions! The first is rather easy to explain but, the second is what is discovered through the experience of creating and consuming them.

To make these delicious little beauties you are going to need to acquire some peeled and deveined “16-20” Shrimp. (16-20 refers to the size of the shrimp and in this case means you will get 16-20 per pound.) You will then need to get some chicken meat, it can be breast meat or thigh meat, doesn’t matter but it needs to be cut up into 1 inch cubes. After that there is the bacon! I myself prefer a nice thick cut bacon but you can use whichever you like the best. Also you will want a box of tooth picks, your favorite seasonings and some BBQ Sauce or Cocktail Sauce. That’s all you need to make your Shigen!

Now, you are on the way to making some of your very own! But, “what’s next?” you ask. Simple!

Take the chicken, dump it in a bowl along with your favorite seasonings this could be a rub or marinade or just about anything you can dream up, and set the chicken off to the side. Next, take out your shrimp and cut almost all the way through along the vein. If you see blood, you have cut through too far and may want to go get a Bandaid. Once all your shrimp are ready, place a piece of chicken in the deeply cut vein, take a piece of bacon and wrap it all the way around the shrimp and the chicken, then skewer it with a toothpick to hold the whole works in place. Cut off any excess bacon, take the scrap piece, lay it next to the remaining bacon and cut that much off from the rest so now you won’t have to do anymore trimming. Repeat the process until you either run out of shrimp or chicken, whichever comes first. (I have usually found that about 3 chicken breasts will make it through a package of shrimp.)

Now, all that is left to cook them, “but how?” you ask. “Shrimp are one of the most delicate things to cook in the world!” you say. First, take a deep breath! It’s going to be okay. If you have a smoker, that is great, just fire it up to about 250. If you don’t, no problem! Fire up your grill whether it be charcoal or gas. But, if it’s charcoal, have your coals on only one side, and if it’s gas, only have one of the burners going. Now that we have everything warmed up and ready to go.

You’re going to place your Shigen on the side without the flame directly under it. For those who have never done this before, it’s what they call in-direct cooking and it is one of the best ways to cook up stuff without charring it to a crisp. Your Shigen will take anywhere from 30-40 minutes to cook. In general you want to see that the shrimp has turned pink and the chicken is white, bacon crispness is going to be to your preference but, I’ve found that when it’s just got a little crisp on the edge is when they are the best. All that is left now is to take them off your grill or smoker, plate them up with some sauce and serve! If you happened to leave the tails on, you can pull the toothpicks out and serve them that way. This is great when you don’t want to find a hundred toothpicks all over your yard the next morning.

Now, there are some of you that are seasoned outdoor cooking pros or may just have a lot of cooking experience and are wondering if this can really be for real, after all, shrimp is very delicate, chicken cooks slower than shrimp, and bacon will never be crispy before the shrimp turns into something resembling an eraser. These my friends are all vital concerns and understandable, so, let me try to explain why it all works. We put the seasonings on the chicken instead of the shrimp because if you salt shrimp it dries up even faster than it normally would because of salt causing it to give off water but, because we put it on the chicken, the shrimp gets extra moisture from the chicken, keeping it from drying out. Also, salt has a tendency to work as a heat conductor so the chicken draws in heat faster and cooks faster because of it.  The bacon works as an insulator for the shrimp by giving it a fat barrier from the heat so the bacon is allowed to get a crisp on it while protecting the delicate flavors of the shrimp. Not to mention, everything just tastes better with bacon. And that, my friends is the magic behind how the Shigen works.

Get outside fire up that grill or smoker and cook up a mess of Shigen not only will you wow your friends but their taste buds as well!

You can find Tom & Big Butz BBQ on most social media outlets like Twitter (@bigbutzbbq) & Facebook.  He’s got a great blog at: http://bigbutzbbqsauce.net Big Butz BBQ sauce is also widely available and highly prized by those who try it – find Tom and get some for yourself!

Thanks Tom!

Green Leaf BBQ is officially open for business in Livermore California. Our new shop is part of Livermore’s historic “Blacksmith Square”.  The Brick building offers a great courtyard for our BBQ classes and events.  Our neighbors offer local botique wine tasting, olive oil tasting and a tapas style restaurant for anybody visiting the Square.  The weather here is great for a backyard BBQ – offering true wine country climate with warm days and cool evenings.

Our shop is open Thursday, Friday and Saturdays from 10:30 am to 7:00 pm.

As always we feature and specialize in The Big Green Egg line of BBQ Smokers.  We also carry Green Mountain Grills, Traeger Grills, Weber Grills, and other products from Lodge, OXO, Victorinox/Foschner, Wicked Good and many custom BBQ Spices, Rubs and Sauces from the professional competition circuit that simply are not available in other stores.

Check back for our BBQ Class and event schedule.

Consider this a hearty welcome to our shop – oh, and we’re pet friendly too

Come in for a visit!

Green Leaf BBQ Shop

21 South Livermore Ave.

Livermore CA 94550

(925) 449-2135

www.greenleafbbq.com

Join us for a Spring kick-off Rib Burn…or Rib-a-Palooza as we’re calling it.  Backyard style event – laid back primer for the season ahead!

Who: Green Leaf BBQ
What: 2010 Spring Rib-a-Palooza (Rib Burn Contest)
Where: 2054 East Canal Drive Turlock, CA 95380
When: April 3, 2010
How Much: $40.00
Judging Style: Backyard – Non Sanctioned
Fuel Restrictions: Non Nuclear powered BBQ’s only…
Prizes: to 3rd place – 1st $200 & Trophy, 2nd $100, 3rd $50
Sponsors: The Rub Co., D-Dog’s BBQ, Blue Star Seasonings
Details: www.greenleafbbq.com Click the Rib-a-Palooza.

Visit our website at: http://www.greenleafbbq.com for the sign-up details and rules to download.

Or visit the CBBQA website at:http://www.cbbqa.com to see the information and current sign-up lists as they are received by the teams.

For details or questions not answered by the info on our website, please email me at oakpit@rocketmail.com

We’ve got 10 teams signed up as of today (Feb 21, 2010)

Green Leaf BBQ strives to take a fresh approach to the old ways of backyard cooking. Barbecue has brought families and friends together for years and we believe that fresh air and great food will always be some of the best things in life. We are a unique retail store that carries specialty barbecues and smokers as well as a large selection of gourmet sauces, rubs and spices that come from award winning locals all over the country. At Green Leaf BBQ, you won’t find gas grills, disposable products or lighter fluid. Instead, you can find a lineup of efficient barbecues and smokers, high quality cookware and accessories, charcoals that come from companies with sustainable practices and gourmet food products that are all natural. We offer cooking classes, first fire techniques, new product demos and private instruction. Our goal is to fuel the creative spirit of cooking outdoors by providing the tools to make anyone feel like a gourmet chef.

Enter your email address to subscribe to this blog and receive notifications of new posts by email.

Join 25 other subscribers